Arduino Project 030 - Line Following Robot
Project 30 Line Following Robot
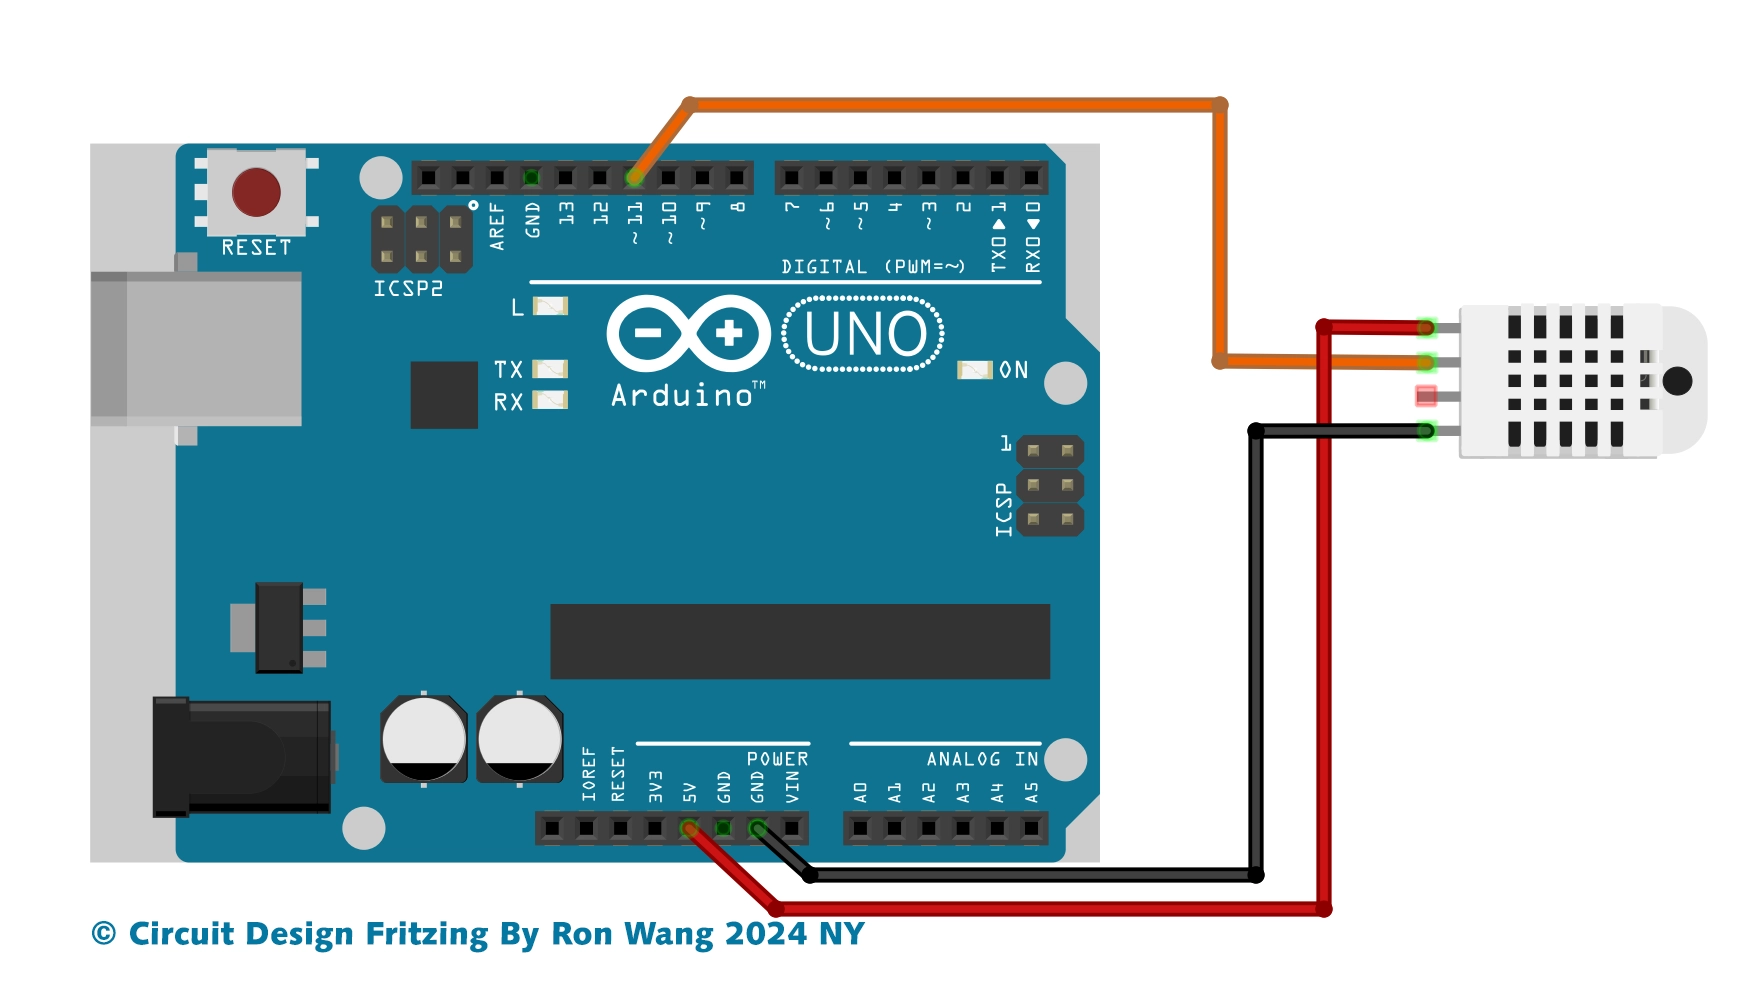
Use L298P Driver Line Following Robot

Line or Trace Following Robot Circuit

Line or Trace Following Robot Schematic
/* Coding Ron Wang
   Nov.21th 2024
   Autaba support for coding Hardware
   Project 30  Tracking Line Robot
 */

int mr1=8;  //motor right 1
int mr2=9;  //motor right 2
int ml1=10; //motor left 1
int ml2=11; //motor left 2
int sr=6;   //sensor right
int sl=7;   //sensor left
int svr=0;
int svl=0;
int led=13;
int enr=3;
int enl=5;
int vspeed=100;
int tspeed=255;
int tdelay=20;

void  setup()
{
 pinMode(mr1,OUTPUT);
 pinMode(mr2,OUTPUT);
 pinMode(ml1,OUTPUT);
  pinMode(ml2,OUTPUT);
 pinMode(led,OUTPUT);
 pinMode(sr,INPUT);
 pinMode(sl,INPUT);

 delay(5000);
}

void loop()
{
 svr=digitalRead(sr);
 svl=digitalRead(sl);

  if(svl==LOW && svr==LOW)
  {
  forward();   // Forward
  }
  if(svl==HIGH  && svr==LOW)
  {
  left();     //Turn left
  }

  if(svl==LOW && svr==HIGH)
  {
  right();     //Turn Right
  }

  if(svl==HIGH && svr==HIGH)
  {
  stop();   // Stop
  }
}
void forward()
 {
  digitalWrite(mr1,HIGH);
  digitalWrite(mr2,LOW);
  digitalWrite(ml1,HIGH);
  digitalWrite(ml2,LOW);
  analogWrite (enr,vspeed);
  analogWrite (enl,vspeed);
 }
void backward()
  {
  digitalWrite(mr1,LOW);
  digitalWrite(mr2,HIGH);
  digitalWrite(ml1,LOW);
  digitalWrite(ml2,HIGH);
  analogWrite (enr,vspeed);
  analogWrite (enl,vspeed);
  }
void right()
 {
  digitalWrite(mr1,LOW);
  digitalWrite(mr2,HIGH);
  digitalWrite(ml1,HIGH);
  digitalWrite(ml2,LOW);
  analogWrite (enr,tspeed);
  analogWrite (enl,tspeed);
  delay(tdelay);
 }
void left()
 {
  digitalWrite(mr1,HIGH);
  digitalWrite(mr2,LOW);
  digitalWrite(ml1,LOW);
  digitalWrite(ml2,HIGH);
  analogWrite (enr,tspeed);
  analogWrite (enl,tspeed);
  delay(tdelay);
}
void stop()
 {
  analogWrite (enr,0);
  analogWrite  (enl,0);
 }
3 Way or 5Way Trace Following Robot
/* Coding Ron Wang
   Nov.21th 2024
   Autaba support for coding Hardware
   Project 30   3way or 5 ways Trace Following Robot
 */

#define lights 9

int LDR1, LDR2, LDR3; // sensor values

// calibration offsets
int leftOffset = 0, rightOffset = 0, centre = 0;

// pins for motor speed and direction

int speed1 = 3, speed2 = 11, direction1 = 12, direction2 = 13;

// starting speed and rotation offset
int startSpeed = 70, rotate = 30;

// sensor threshold
int threshhold = 5;

// initial speeds of left and right motors
int left = startSpeed, right = startSpeed;

// Sensor calibration routine
void calibrate() {
 for (int x=0; x<10; x++) { // run this 10 times to obtain average
 digitalWrite(lights, HIGH); // lights on
 delay(100);
 LDR1 = analogRead(0); // read the 3 sensors
 LDR2 = analogRead(1);
 LDR3 = analogRead(2);
 leftOffset = leftOffset + LDR1; // add value of left sensor to total
 centre = centre + LDR2; // add value of centre sensor to total
 rightOffset = rightOffset + LDR3; // add value of right sensor to total
 delay(100);
 digitalWrite(lights, LOW); // lights off
 delay(100);
 }

 // obtain average for each sensor
 leftOffset = leftOffset / 10;
 rightOffset = rightOffset / 10;
 centre = centre /10;
 // calculate offsets for left and right sensors
 leftOffset = centre - leftOffset;
 rightOffset = centre - rightOffset;
}

void setup()
{
 // set the motor pins to outputs
 pinMode(lights, OUTPUT); // lights
 pinMode(speed1, OUTPUT);
 pinMode(speed2, OUTPUT);
 pinMode(direction1, OUTPUT);
 pinMode(direction2, OUTPUT);
 // calibrate the sensors
 calibrate();
 delay(3000);
 digitalWrite(lights, HIGH); // lights on
 delay(100);
 // set motor direction to forward
 digitalWrite(direction1, HIGH);
 digitalWrite(direction2, HIGH);
 // set speed of both motors
 analogWrite(speed1,left);
 analogWrite(speed2,right);
}

void loop() {

 // make both motors same speed
 left = startSpeed;
 right = startSpeed;
 // read the sensors and add the offsets
 LDR1 = analogRead(0) + leftOffset;
 LDR2 = analogRead(1);
 LDR3 = analogRead(2) + rightOffset;

 // if LDR1 is greater than the centre sensor + threshold turn right
 if (LDR1 > (LDR2+threshhold)) {
 left = startSpeed + rotate;
 right = startSpeed - rotate;
 }

 // if LDR3 is greater than the centre sensor + threshold turn left
 if (LDR3 > (LDR2+threshhold)) {
 left = startSpeed - rotate;
 right = startSpeed + rotate;
 }

 // send the speed values to the motors
 analogWrite(speed1,left);
 analogWrite(speed2,right);
} 版权声明:本文为原创文章,版权归donstudio所有,欢迎分享本文,转载请保留出处!