Arduino Project 037 - 18B20 Temperature Sensor
The DS18B20 Temperature Sensor is a digital temperature sensor capable of measuring temperatures with exceptional accuracy. Known for its simplicity and versatility, this sensor operates on the OneWire protocol, simplifying its integration with microcontrollers like Arduino.In this sensors and modules guide, we’ll explore its working principle, key features, applications, and how it can enhance your Arduino projects.
How the DS18B20 Temperature Sensor Works
The DS18B20 temperature sensor employs a digital thermometer that converts temperature readings into digital signals. Its unique serial number allows multiple sensors to operate on the same data bus, enabling precise multi-sensor temperature monitoring.
Features and Specifications
Temperature Range: -55C ~ +125C
Accuracy Range: ±0.5C
Operating Voltage: 3.0V to 5.5V
Digital Interface: Uses the OneWire protocol for communication.
Compatibility: This sensor is also compatible with other devices like the Arduino,Raspberry Pi etc.
Pin Configuration
Wiring the DS18B20 Sensor Module to an Arduino is fairly simple. The connections are as follows:
G on the DS18B20 Sensor Module to GND on the Arduino.
VDD on the DS18B20 Sensor Module to 5V on the Arduino.
S on the DS18B20 Sensor Module to Digital pin 2 on the Arduino.
The OneWire.h Library
The OneWire.h library is essential for working with the DS18B20 Temperature Sensor. This library provides the necessary functions and protocols to communicate with the sensor via the OneWire protocol.
The OneWire protocol is a communication protocol that allows multiple devices (like the DS18B20 sensor) to communicate with an Arduino using a single data wire. It simplifies the process of interfacing with multiple sensors on the same data bus.
Functions within the OneWire.h library enable actions such as initializing communication, reading and writing data, and accessing specific devices on the OneWire bus. Without this library, interfacing and communicating with the DS18B20 sensor using the OneWire protocol would be considerably more complex.
Installing the OneWire.h Library
To install the OneWire library in the Arduino IDE, follow these steps:
Open the Arduino IDE on your computer.
Go to the “Sketch” menu at the top of the Arduino IDE.
Select “Include Library” and then click on “Manage Libraries…”
A Library Manager window will open. In the search bar at the top right corner, type “OneWire”.
Look for the “OneWire” library by Jim Studt, Paul Stoffregen. Once you find it, click on the library entry.
Click the “Install” button to install the library.
Once the installation process completes, close the Library Manager.
After following these steps, the OneWire library will be installed and available for use in your Arduino sketches.
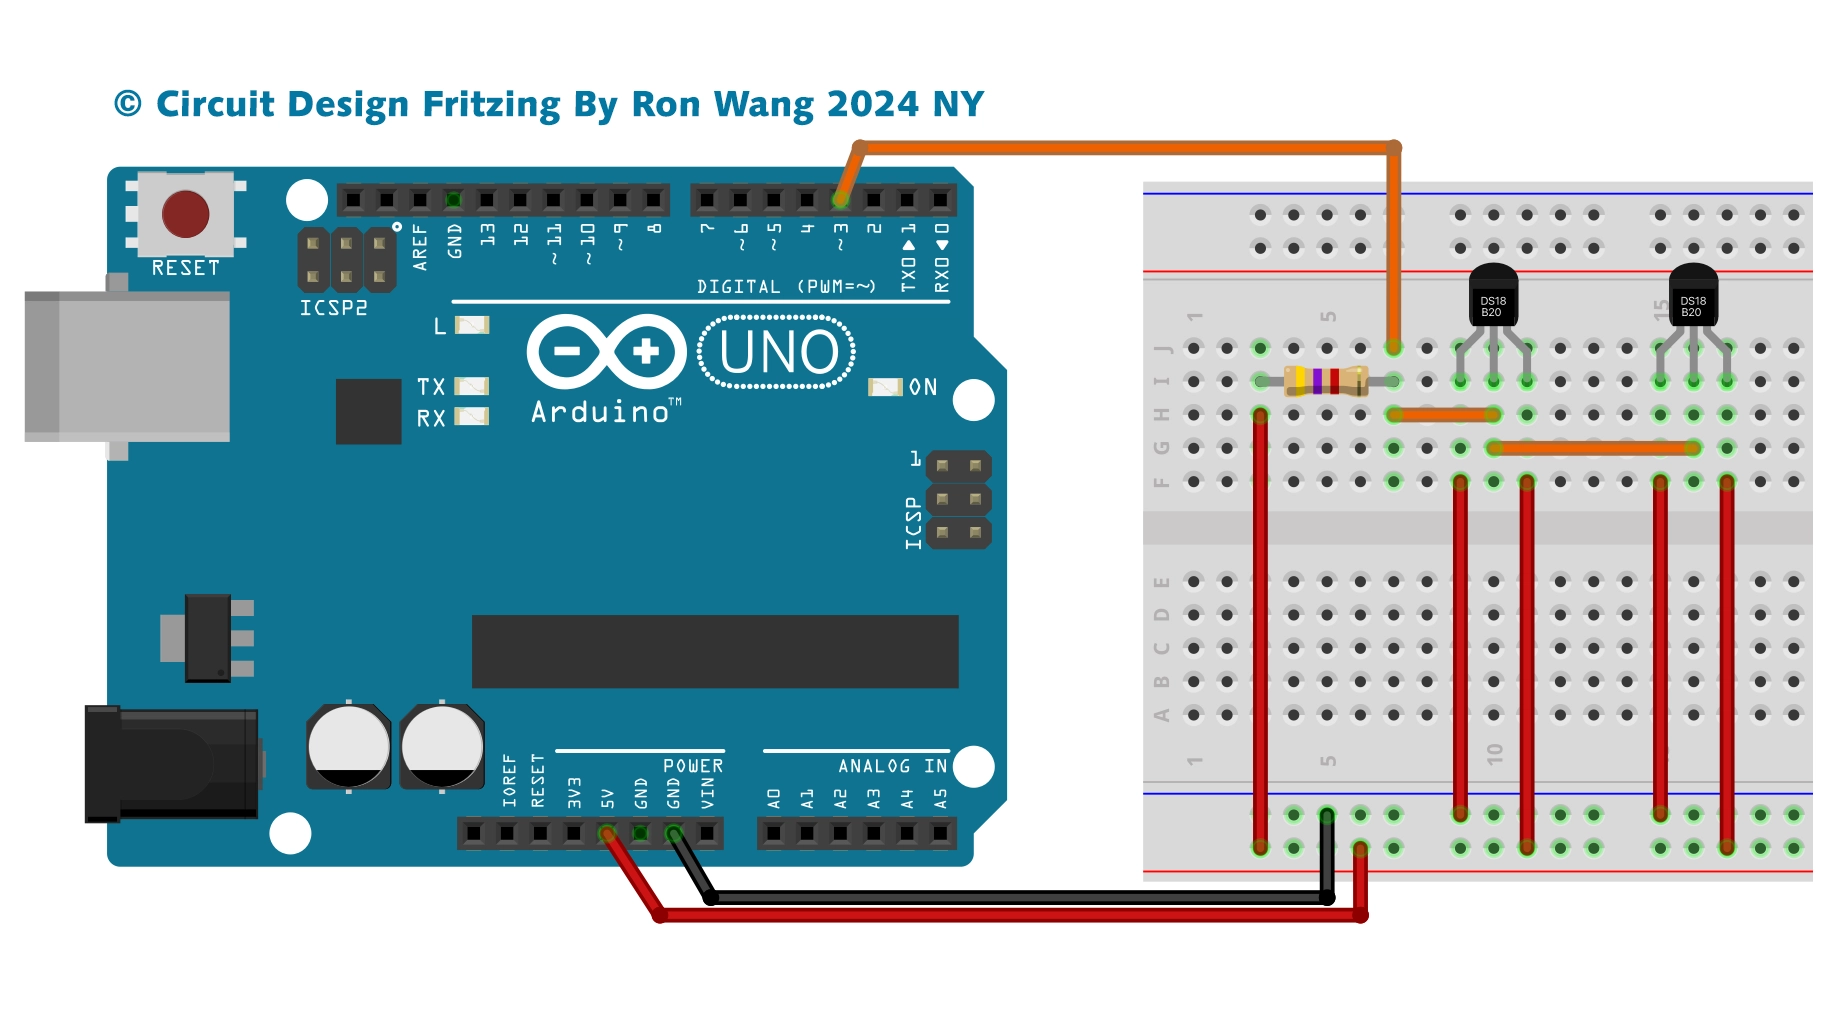
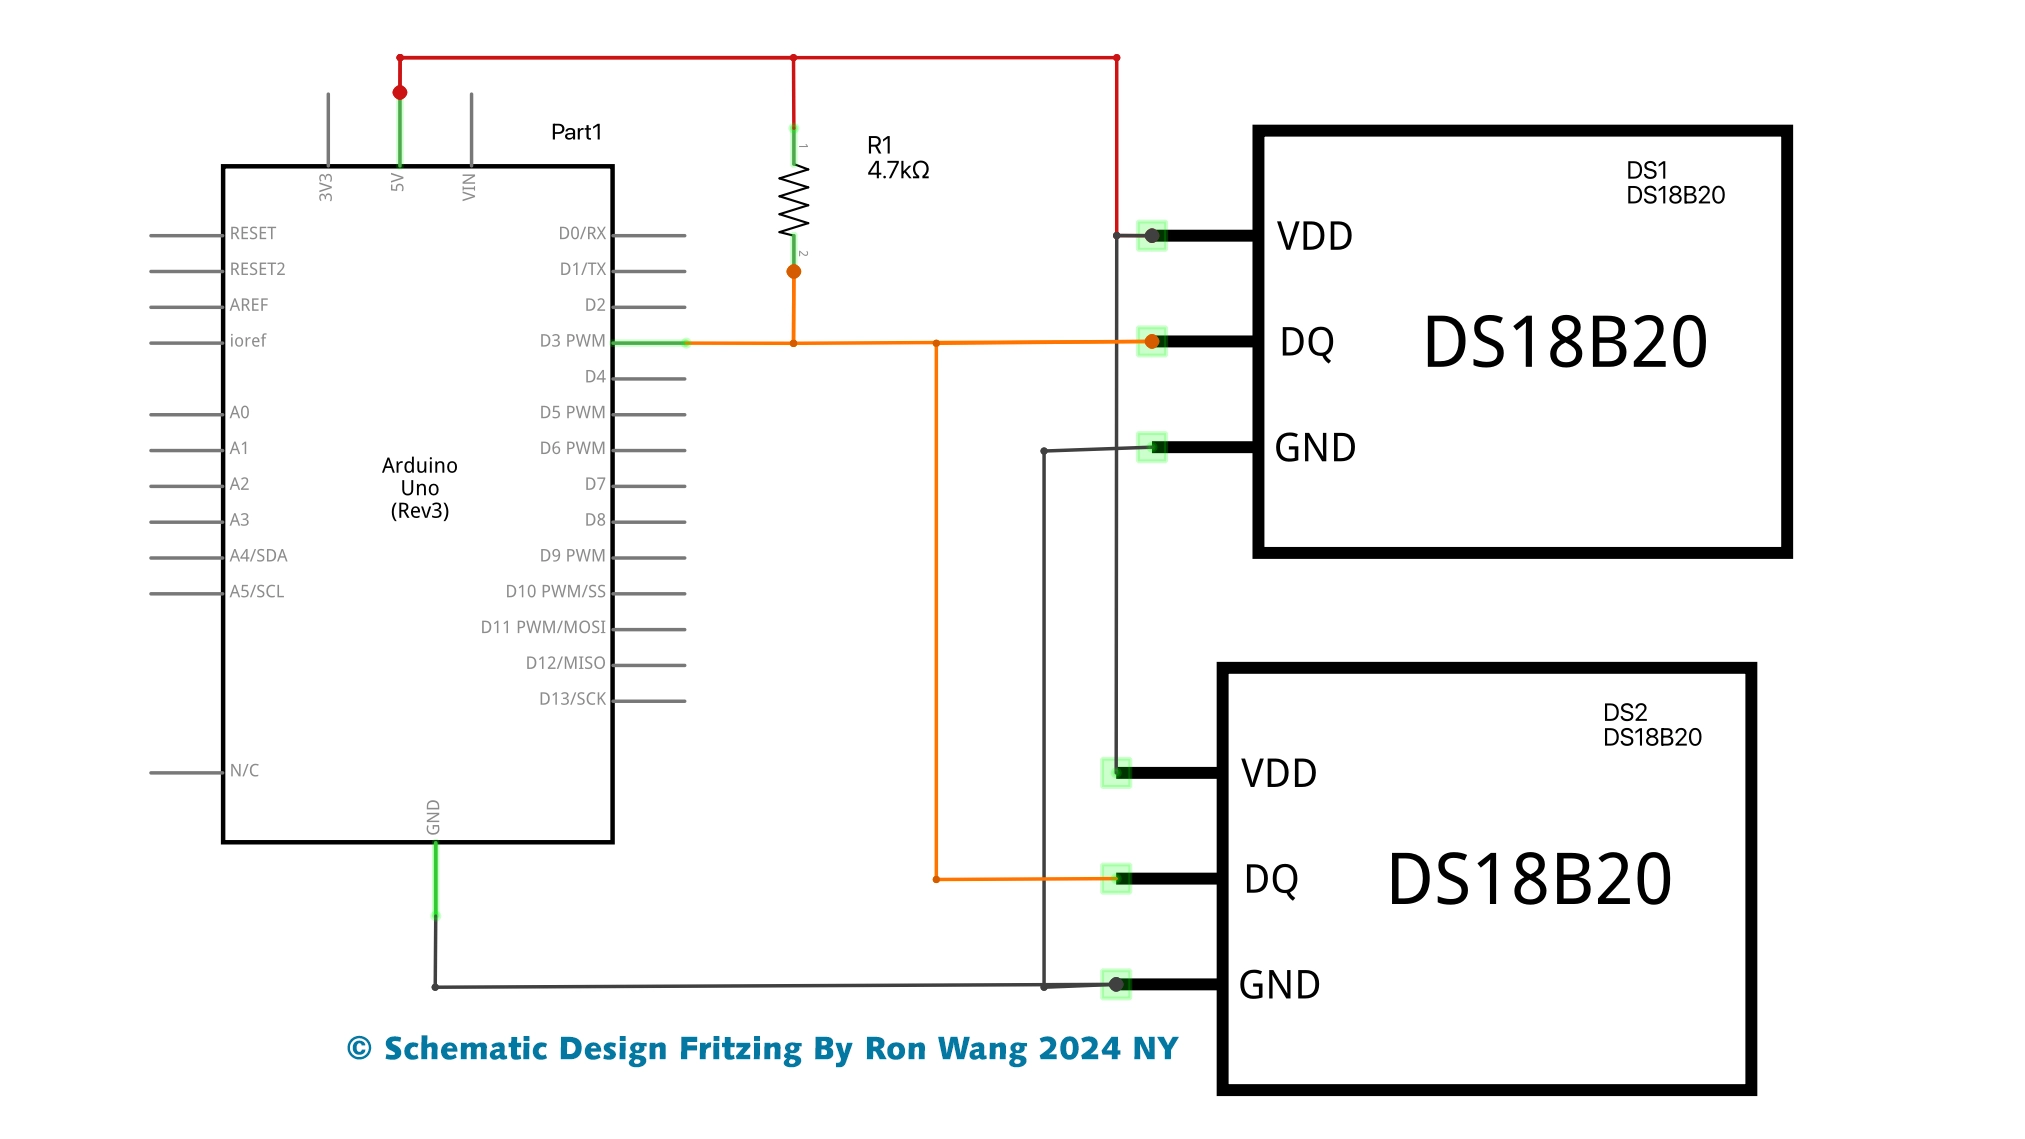
Project 37A DS18B20 Temperature Sensor
// Project 37A DS18B20 Temperature Sensor
#include <OneWire.h>
#include <DallasTemperature.h>
// Data line goes to digital pin 3
#define ONE_WIRE_BUS 3
// Setup a oneWire instance to communicate with any OneWire devices (not just Maxim/Dallas temperature ICs)
OneWire oneWire(ONE_WIRE_BUS);
// Pass our oneWire reference to Dallas Temperature
DallasTemperature sensors(&oneWire);
// arrays to hold device addresses
DeviceAddress insideThermometer, outsideThermometer;
void setup()
{
// start serial port
Serial.begin(9600);
// Start up the library
sensors.begin();
// locate devices on the bus
Serial.print("Locating devices...");
Serial.print("Found ");
Serial.print(sensors.getDeviceCount(), DEC);
Serial.println(" devices.");
if (!sensors.getAddress(insideThermometer, 0)) Serial.println("Unable to find address for Device 0");
if (!sensors.getAddress(outsideThermometer, 1)) Serial.println("Unable to find address for Device 1");
// print the addresses of both devices
Serial.print("Device 0 Address: ");
printAddress(insideThermometer);
Serial.println();
Serial.print("Device 1 Address: ");
printAddress(outsideThermometer);
Serial.println();
Serial.println();
}
// function to print a device address
void printAddress(DeviceAddress deviceAddress)
{
for (int i = 0; i < 8; i++)
{
// zero pad the address if necessary
if (deviceAddress[i] < 16) Serial.print("0");
Serial.print(deviceAddress[i], HEX);
}
}
// function to print the temperature for a device
void printTemperature(DeviceAddress deviceAddress)
{
float tempC = sensors.getTempC(deviceAddress);
Serial.print("Temp C: ");
Serial.print(tempC);
Serial.print(" Temp F: ");
Serial.print(DallasTemperature::toFahrenheit(tempC));
}
// main function to print information about a device
void printData(DeviceAddress deviceAddress)
{
Serial.print("Device Address: ");
printAddress(deviceAddress);
Serial.print(" ");
printTemperature(deviceAddress);
Serial.println();
}
void loop()
{
// call sensors.requestTemperatures() to issue a global temperature
// request to all devices on the bus
Serial.print("Requesting temperatures...");
sensors.requestTemperatures();
Serial.println("DONE");
// print the device information
printData(insideThermometer);
printData(outsideThermometer);
Serial.println();
delay(1000);
}
Project 37B DS18B20 Temperature Sensor
// Project 37B DS18B20 Temperature Sensor

#include <OneWire.h>
#include <DallasTemperature.h>
// Data wire is plugged into pin 3 on the Arduino
#define ONE_WIRE_BUS 3
#define TEMPERATURE_PRECISION 12
// Setup a oneWire instance to communicate with any OneWire devices (not just Maxim/Dallas temperature ICs)
OneWire oneWire(ONE_WIRE_BUS);
// Pass our oneWire reference to Dallas Temperature.
DallasTemperature sensors(&oneWire);
// arrays to hold device addresses – replace with your sensors addresses
DeviceAddress insideThermometer = { 0x28, 0xCA, 0x90, 0xC2, 0x2, 0x00, 0x00, 0x88 };
DeviceAddress outsideThermometer = { 0x28, 0x3B, 0x40, 0xC2, 0x02, 0x00, 0x00, 0x93 };
void setup()
{
// start serial port
Serial.begin(9600);
// Start up the library
sensors.begin();
Serial.println("Initialising...");
Serial.println();
// set the resolution
sensors.setResolution(insideThermometer, TEMPERATURE_PRECISION);
sensors.setResolution(outsideThermometer, TEMPERATURE_PRECISION);
}
// function to print the temperature for a device
void printTemperature(DeviceAddress deviceAddress)
{
float tempC = sensors.getTempC(deviceAddress);
Serial.print(" Temp C: ");
Serial.print(tempC);
Serial.print(" Temp F: ");
Serial.println(DallasTemperature::toFahrenheit(tempC));
}
void loop()
{
// print the temperatures
Serial.print("Inside Temp:");
printTemperature(insideThermometer);
Serial.print("Outside Temp:");
printTemperature(outsideThermometer);
Serial.println();
delay(3000);
}版权声明:本文为原创文章,版权归donstudio所有,欢迎分享本文,转载请保留出处!


